Publish and upgrade your Flutter Package on pub.dev
Curiosity killed the cat, but satisfaction brought it back.

You are developing your awesome flutter app implementation awesome functionalities and awesome widgets. Now you want to share that awesomeness with others.
How do you do so?
Of course. By publishing your awesome widgets as a package.
But how do you do so?
In this article, I want to show how to create and publish a package in “pub.dev ”.
First, pick a name for your package, mine will be hello_world which will return a container with the text “Hello World”. Then run
flutter create --template=package hello_world
in your terminal. It will create a template for your package in my case hello_world. In the template, you will find different files. Let’s look at some of them:

CHANGELOG.md: Here you will write the changes you made/added to the project. It is a record of changes for tracking your package and its version. It will appear in the changelog of your package.
LICENSE: You can add your license here.
pubspec.yaml: Your package dependencies go here.
README.md: It will appear in the Readme of your package. It can contain brief summary of your package along with documentation, example, installation, and so on.
lib: It is where you will write your package
Now let’s write the package.
Inside the lib, we will find hello_world.dart. Inside you will find the template.
library hello_world;

/// A Calculator.
class Calculator {
  /// Returns [value] plus 1.
  int addOne(int value) => value + 1;
}
The
librarykeyword is used to give the library a name, which can be used to reference it from other parts of the code.
Let’s write our package.
library hello_world;

import 'package:flutter/material.dart';

class HelloWorld extends StatelessWidget {
  const HelloWorld({super.key});

  @override
  Widget build(BuildContext context) {
    return const Center(
      child: Text("Hello World!"),
    );
  }
}
Oh, and let’s initialize a Git repo in our project which helps when we need to publish our package.
Now we are ready to publish our package. Right?
Wrong. Before publishing the package, we still go something left to do. First, let’s organize our code.
We will create a new folder lib/src and put our implementation/widget there.
You can have any folder structure, but it is recommended to use lib/src . [source](https://dart.dev/guides/libraries/create-library-packages)
After that our project will look like this.
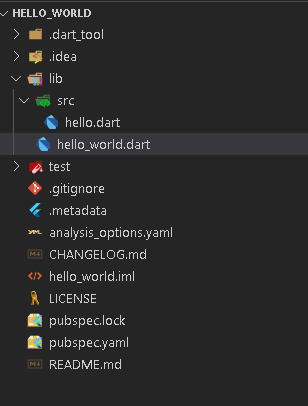
We have moved out implementation code to hello.dart inside src.
E.g., hello.dart
import 'package:flutter/material.dart';

class HelloWorld extends StatelessWidget {
  const HelloWorld({super.key});

  @override
  Widget build(BuildContext context) {
    return const Center(
      child: Text("Hello World!"),
    );
  }
}
hello_world.dart is used as a barrel file to export our implementation.
E.g., hello_world.dart
library hello_world;

export "src/hello.dart";
A barrel file is a way to integrate multiple exports from different files into a single export.
Now our package is complete. Before publishing let’s add an example.

The example will contain a code from example/lib/main.dart. We haven’t yet created an example folder.
Let’s run the command:
flutter create example
After this, you will have a flutter project with a name example. Inside pubspec.yaml of example you can import your package in example with path: ../ instead of version.
E.g. example/pubspec.yaml
name: example
description: A new Flutter project.

publish_to: 'none'

version: 1.0.0+1

environment:
  sdk: '>=2.18.5 <3.0.0'

dependencies:
  flutter:
    sdk: flutter
  cupertino_icons: ^1.0.2
  hello_world:
    path: ../

dev_dependencies:
  flutter_test:
    sdk: flutter
  flutter_lints: ^2.0.0

flutter:
  uses-material-design: true
Now my lib/main.dart will be
E.g lib/main.dart
import 'package:flutter/material.dart';
import 'package:hello_world/hello_world.dart';

void main() {
  runApp(const MyApp());
}

class MyApp extends StatelessWidget {
  const MyApp({super.key});

  @override
  Widget build(BuildContext context) {
    return MaterialApp(
      title: 'Flutter Demo',
      theme: ThemeData(
        primarySwatch: Colors.blue,
      ),
      home: const MyHomePage(title: 'My Package'),
    );
  }
}

class MyHomePage extends StatefulWidget {
  const MyHomePage({super.key, required this.title});

  final String title;

  @override
  State<MyHomePage> createState() => _MyHomePageState();
}

class _MyHomePageState extends State<MyHomePage> {
  @override
  Widget build(BuildContext context) {
    return Scaffold(
      appBar: AppBar(
        title: Text(widget.title),
      ),
      body: const HelloWorld(),
    );
  }
}
This will be displayed in the example section of pub.dev of your package.
Now let’s change CHANGELOG.md
## 0.0.1

* Initial release of Hello World.
Now let’s write README.md
# Hello World
Gives Hello World widget

## Features
  - Hello world
  - Awesome
  - Null Safety

## Example Project
 Check the `example` folder
Now, let’s add a license to our package. You can use this website to help you choose your license.
MIT License

Copyright (c) 2022 Safal Shrestha

Permission is hereby granted, free of charge, to any person obtaining a copy
of this software and associated documentation files (the "Software"), to deal
in the Software without restriction, including without limitation the rights
to use, copy, modify, merge, publish, distribute, sublicense, and/or sell
copies of the Software, and to permit persons to whom the Software is
furnished to do so, subject to the following conditions:

The above copyright notice and this permission notice shall be included in all
copies or substantial portions of the Software.

THE SOFTWARE IS PROVIDED "AS IS", WITHOUT WARRANTY OF ANY KIND, EXPRESS OR
IMPLIED, INCLUDING BUT NOT LIMITED TO THE WARRANTIES OF MERCHANTABILITY,
FITNESS FOR A PARTICULAR PURPOSE AND NONINFRINGEMENT. IN NO EVENT SHALL THE
AUTHORS OR COPYRIGHT HOLDERS BE LIABLE FOR ANY CLAIM, DAMAGES OR OTHER
LIABILITY, WHETHER IN AN ACTION OF CONTRACT, TORT OR OTHERWISE, ARISING FROM,
OUT OF OR IN CONNECTION WITH THE SOFTWARE OR THE USE OR OTHER DEALINGS IN THE
SOFTWARE.
You can add the homepage and repository field to your pubspec.yaml .

Now run
flutter pub publish --dry-run
This command will analyze our package and warns us if there is any error/issues in our packages. After that, you can publish your package to pub.dev with the command:
flutter pub publish
Remember publishing is forever. After running the command, you will be asked to authenticate, and your package will be published after authenticating.
If you want to upgrade your package. Increase your package version and run flutter pub publish again.
In this post, you learned how to publish and upgrade your package. If you have any problem, you can reference my package here.
Thanks for reading!


